With SiteDu.de Builder, setting up a blog and publishing articles is easy, even for beginners, thanks to its intuitive and user-friendly interface. In this chapter, we’ll walk you through the step-by-step process of creating your blog and crafting engaging blog articles.
Blog articles vs. Regular pages #
Before we delve into the details, it’s crucial to understand the difference between regular pages and blog articles. Both are essential elements of a website, but they serve different purposes and have distinct characteristics.
- Regular Pages:
These are the static pages on your website that provide essential information about your business or organization. They typically include the homepage, about us page, contact page, services page, etc. The content on these pages doesn’t change frequently and is not usually date-specific. - Blog Articles:
Blog articles, also known as blog posts, are regularly refreshed with fresh content and can be found in the blog section of your website. They are typically organized by publication date and categories, making it easier for visitors to find specific content. Writing blog articles is an effective method to establish a connection with your audience, provide them with regular updates and valuable insights, all while enhancing your website’s SEO ranking.
Now that you know the difference between regular pages and blog articles, we can start exploring how to create a blog and blog articles on your Sitedu.de website. Let’s dive in!
Manage & Add articles #
To manage your blog, go to the “Articles & Blog” tab, then click “Article manager”. Click on “New article” to start working on a new blog post if you already know how the system works.
Let’s take a look at the Article Manager:
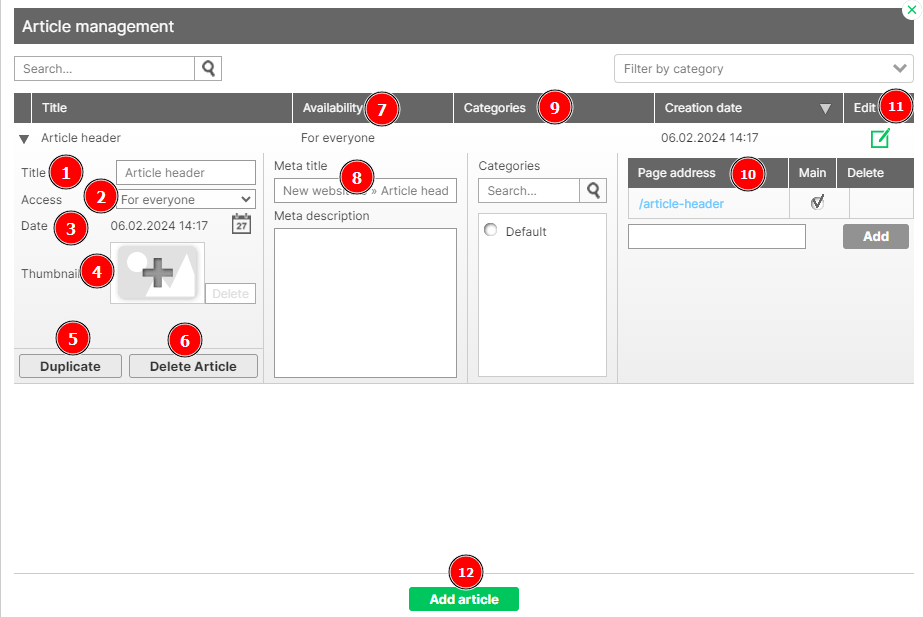
- Title — change the title of your article.
- Availability — set the availability of your article, you can choose 3 options:
- Everyone — all visitors to your site can easily see the article.
- Logged in only — logged in people can access this article (the “login” element).
- Password — people who have a password for a given article can see it.
- Date — change the date of publication of your article, to change the date, click the calendar icon.
- Thumbnail — add a thumbnail of your article to display when sharing the link, e.g. on Facebook.
- Duplicate — duplicate your article and change its content without any problems.
- Delete article — you don’t like your article, you can delete it without any problem.
- Status — if you want your article not to be displayed on the Internet, change its status to non-public.
- Meta title and meta description — take care of the positioning of your articles in one place and set the meta description and title here.
- Categories — give your article correct categories; this is useful for organizing your blog, but also your online store.
- Sub-page address — if you want to edit your sub-page address, you can easily change it and set your own address as the main one.
- Edit — go to edit your article.
12. Add article — add your article from “Article management”.
Categories #
Categories allow us to keep the list of articles in order, we use them in creating an online store, and a blog.
- Go to the “Articles” tab then click “Categories”.
- Check out your options within the “Categories” tab.
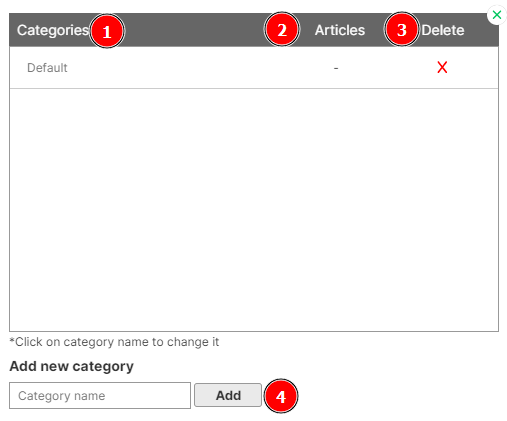
1. Categories — the name of your category, you can change it by clicking on it.
2. Article — the number of articles with the selected category.
3. Delete — you can easily delete your category by clicking on the red cross.
4. Add new category — enter the name of the new category in the text box and click on the “Add” button.
Article Layout #
Do you want to change the look and design of your articles? You can do that with article layouts.
1. To create an article template, click „Article layouts“ under the „Articles“ tab

2. Then add a new article design by clicking the „Add template“ button

3. In the website builder, a new article template will be opened. We can edit it just like a regular subpage – add and remove elements, move them around and change their style.
Special elements of the article template #
Once you have created an article template, you will find several special elements in it. These elements allow you to add the content of the article, its title, display the date of creation of the article and its thumbnail.

Article title (News Header)
The article header is an element where we can enter the title of the article. This title will be displayed in the article listings and will also be inserted into the article URL by default.
Article content (News Content)
Article content is a simple text element. As the name suggests, you can enter the content of your article in it and insert images. The first words of the article content will be displayed in the article list as its abbreviation.
Article thumbnail (News thumbnail)
Thumbnail is a photo that is displayed in the article list as a thumbnail of the article. The thumbnail can be changed just like any other photo, that is, by clicking on the edit icon in the corner of the item. It can also be changed by clicking on the icon in the side edit panel and through the article list.
Article date (News date)
The article creation date displays when the article was created.
Variable content in the elements #
In the article template, we determine how the articles should look. So we define the positions and general appearance of the elements.
We enter their content when we create individual articles.
Elements that can have different content from article to article are all special elements and Facebook-related galleries and buttons (i.e. likes and comments). The content of these elements can be changed between articles.
Hide special elements #
Every article template has fixed special elements that cannot be removed. But don’t worry, if you wish to customize the template and replace certain elements, like replacing the article thumbnail with a slider, you can easily do so. Just hide the element you want to replace by clicking on the eye icon in the layers list.

Write your article #
Writing your next article is a very straightforward process.
- First, click in the top menu on „Articles & Blog“ and then on „New article“.
- Next you can choose the layout.
- Choose the category (or categories) the article belongs to and click on „create“
- Edit the article as you would edit a regular page. Simply replace the existing text and add images.
Display articles on a page #
To display articles on your site use the „Newsfeed – article list“ element. You can find more information about this element here [LINK].


